Category Archives: SAP Technical Change & CTS
Step-by-Step process of Importing Support Packages into ECC6 EHP4 System
In this blog we look at a step-by-step procedure to import HR support packages (HR Sp 16 to 20) & (EA-HR 16 to 20) into a ECC6 system with EHP4.
The most important part of the installation is the preparation work. This is absolutely critical that side-effect notes, relevant basis notes and patches are applied before applying the support packages (see appendix). 99% Preparation, 1% perspiration!
Remember you can only download SP’s from Solution manager (well sort of). What SolMan really does is generate the link for you to download the SPs. Once you have the link generated, you can just call the link from your browser independent of SolMan (see appendix on process).
Another point I want to highlight is in this scenario, we are simply updating a subset of Support packages i.e HR support packages and not the Support Pack ‘Stack’. Whilst it is recommended to apply the stack, this is not always practical and feasible due to resources, availability to test and other complexities in large SAP landscapes.
1.1 Check all pre-requisites are met, e.g file system space, SAP notes, locked users, etc. See appendix below for checklist of what to do.
1.2 Login to Client 000 with a Super User (SAP_ALL/SAP_NEW)
1.3 Ensure all the required SP’s have been downloaded from the SAP Marketplace and have been unzipped/uncarred into the …./EPS/in folders. The process of identifying which SP’s to load and the interdependencies is a separate task on its on and usually conducted in conjunction/direction of the application/functional team
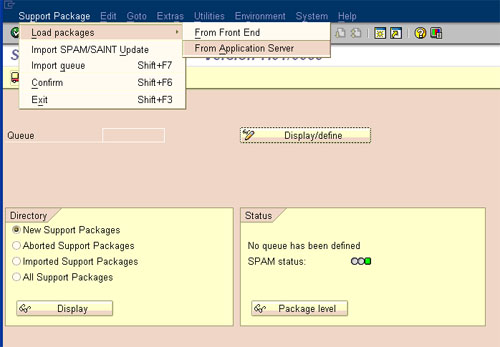
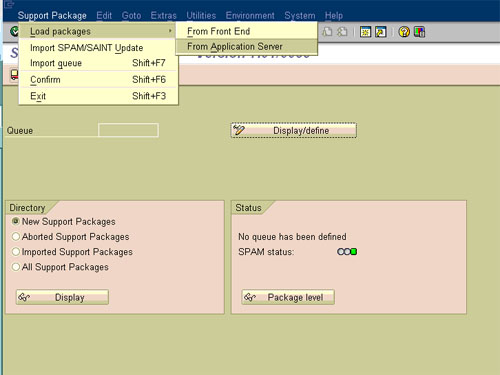
1.4 Load SP’s from App server (you must first download the *.SAPCAR files and extract it in …usr/sap/trans/EPS/in
1.5 Define Queue. – Essentially what you are doing here is telling SAP which SPs you want to import. It is intelligent enough to calculate interdependencies.
Load the SP’s from the Application server (after you have unzipped them into the ../EPS/in folder). Pick the highest SP number. (It will automatically included other SP’s or dependencies.). If you are importing SP for different modules e.g HR, Finance, etc, then you may need to build the queue and change the settings to “Calculation for a Vector of components”.
Queue calculation for a vector of software components:
The Support Package queue calculation takes place for multiple software components based on the target Support Package level that has been defined for each software component (see Defining a Queue Based on Multiple Software Components).
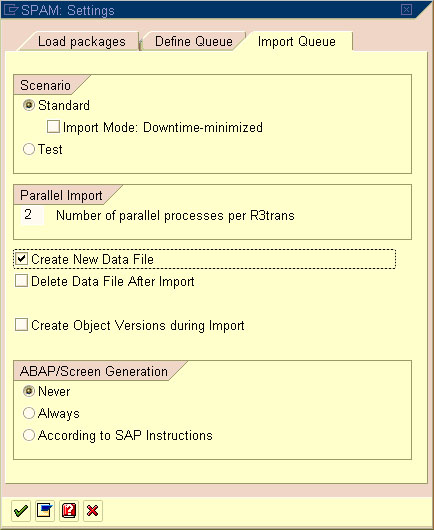
1.6 Check SPAM settings:
You can schedule more parallel processes if you like and if you system can support. These are the typical settings I use when importing initially into a development system
Check if the SPAM settings are as follows :
Section Import queue
Create new datafile = Yes (only in DEVELOPMENT)
Delete data file after import = No
Section ABAP/Screen Generation
Generate screen = Never
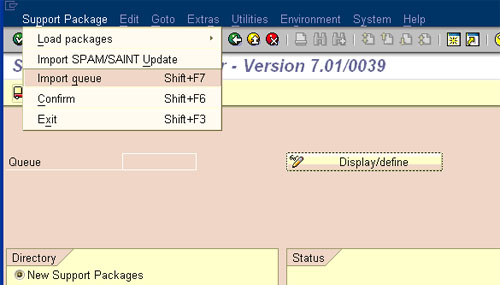
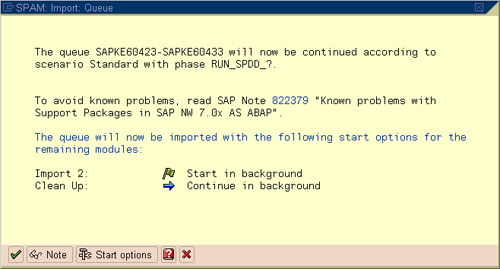
1.7 Import Support Packages (Shift + F7)
This step onwards basically kicks starts the SP import process. From now onwards, there is no going back (well almost).
Please refer to link on SAP Help below for known errors during import:
http://help.sap.com/saphelp_nw04/helpdata/en/7e/c6c2ad98a711d2b429006094b9ea64/content.htm
Generally I Run phase 1 in ‘dialog mode’ and all other phases in ‘background’ mode
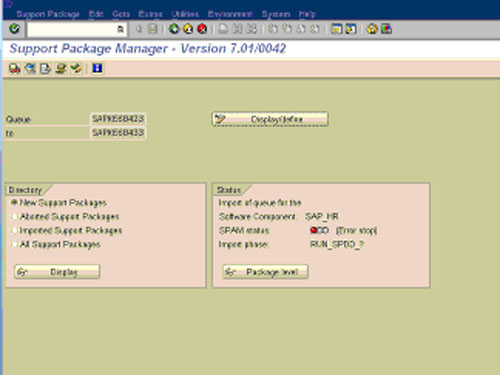
These are the various phases the SPAM goes through during the import process. You will see the phases change in the ‘Status’ section in tcode SPAM:
Preparation Module
…
1. PROLOGUE
This phase checks whether you are authorized to import Support Packages.
2. CHECK_REQUIREMENTS
This phase checks various requirements for importing a Support Package, for example, whether the transport control program tp can log on to your system.
3. DISASSEMBLE
This phase unpacks files from the appropriate EPS parcels and saves them to the transport directory.
4. ADD_TO_BUFFER
This phase places the queue in the transport buffer of your system.
5. MODIFY_BUFFER
This phase prepares the transport buffer for correct processing of the following import phases.
6. TEST_IMPORT
This phase performs a test import for the queue with the transport control program tp. The system checks whether there are objects that are in open repairs and that are overwritten during the import, or whether other conditions prevent the import of an object.
7. IMPORT_OBJECT_LIST
This phase imports the object lists for the Support Packages in the queue into the system.
8. OBJECTS_LOCKED_?
This phase checks whether there are objects that are overwritten by the import, and that are still in unreleased requests.
9. ADDON_CONFLICTS_?
This phase checks whether there are conflicts between objects in the queue and any installed add-ons.
10. SCHEDULE_RDDIMPDP
This phase schedules the transport daemon (program RDDIMPDP).
Import 1 Module
11. CREATE_VERS_BEFORE
This phase generates versions of the objects that are contained in the Support Packages in the queue (if this option is set).
12. SPDD_SPAU_CHECK
In this phase, the system checks if a modification adjustment is necessary (transactions SPDD/SPAU).
13. DDIC_IMPORT
This phase imports all ABAP Dictionary objects in the queue.
14. AUTO_MOD_SPDD
This phase checks whether all modifications to ABAP Dictionary objects can be adjusted automatically.
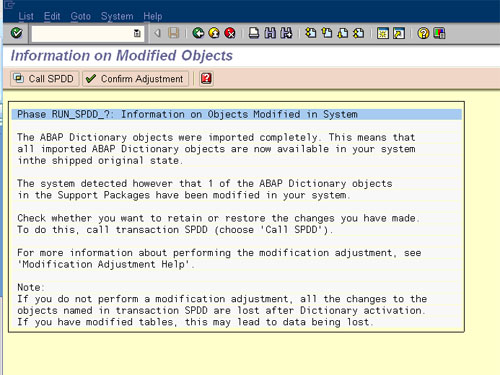
15. RUN_SPDD_?
In this phase, you are asked to adjust your modifications to the ABAP Dictionary objects by calling transaction SPDD.
16. LOCK_EU (only for import mode downtime-minimized)
This phase locks the development environment.
17. INACTIVE_IMPORT (only for import mode downtime-minimized)
This phase imports program code and program texts in an inactive state.
18. DDIC_ACTIVATION
This phase activates the imported ABAP Dictionary objects.
Import 2 Module
19. IMPORT_PROPER
This phase imports all the Repository objects and table entries if they were not already imported in the INACTIVE_IMPORT phase. This is preceded by actions such as table conversion and activation of the name tabs.
20. PREPARE_XPRA
This phase prepares the execution of the XPRAs and after-import methods.
21. UNLOCK_EU (only for import mode downtime-minimized)
This phase unlocks the development environment.
22. AUTO_MOD_SPAU
This phase checks whether modifications can be adjusted automatically.
23. XPRA_EXECUTION
This phase executes the XPRAs and after-import methods.
24. ABAP_GENERATION
This phase generates the runtime objects for the imported Repository objects (ABAP source texts and screens).
Clean Up Module
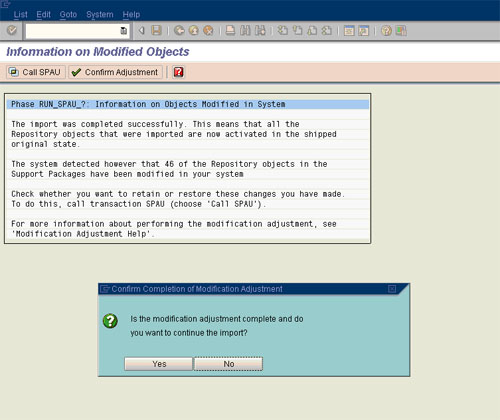
25. RUN_SPAU_?
This phase prompts you to adjust your modifications to Repository objects by calling transaction SPAU.
26. CLEAR_OLD_REPORTS (only for import mode downtime-minimized)
This phase deletes the obsolete versions of program code and program texts in the database.
27. EPILOGUE
This phase completes the import. Among other things, it checks whether the queue has been processed completely.
1.8 Main Import Phases and Actions required.
In the following steps below, I only highlight only the main phases and the necessary actions required. Generally if you have done your homework and checked and met all prerequisites, you should a relatively smooth import process.
1.8.1 SPDD Adjustment – Handover to Developer
SPAM -> Goto -> Status – Queue to confirm adjustment to proceed to next phase
1.9 SPAU Adjustment
After the SPDD is completed, it will go through a number of phases and eventually pause at SPAU adjustment phase (RUN_SPAU). Now again, ask the developers to continue with the SPAU adjustments (This is only done in Development systems. For changes to take place in all downstream systems, transports are created and imported into e.g QA and PROD and usually after the SP’s are applied).
Once developers complete their SPAU adjustments successfully (be patience, this can take from several hours to a week or more depending on size of landscape and amount of customising), simply resume i.e Goto Support Package -> Import Queue (similar to SPDD steps)
1.10 Tail end – EPILOGUE
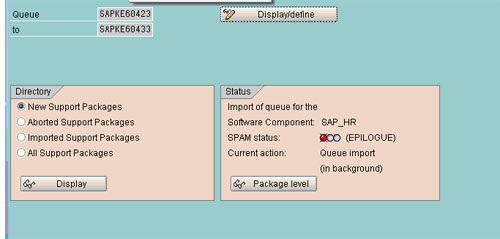
Finally, it all goes well, the last phase is the EPILOGUE as shown below. This should not take that long and once completed, you proceed to confirm (or complete) the import with the next step
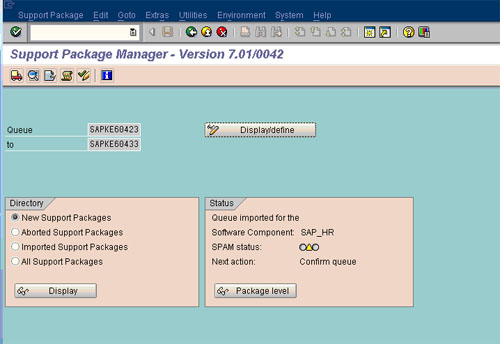
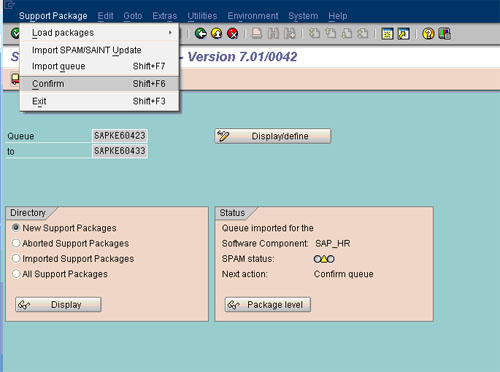
Once EPILOGUE completed, the Status will turn Yellow. You must then go to Support Packages -> Confirm (Shift F6) to close off or complete the SP implementation.
1.11 Lastly, CONFIRM queue
Method to confirm queue shown below.
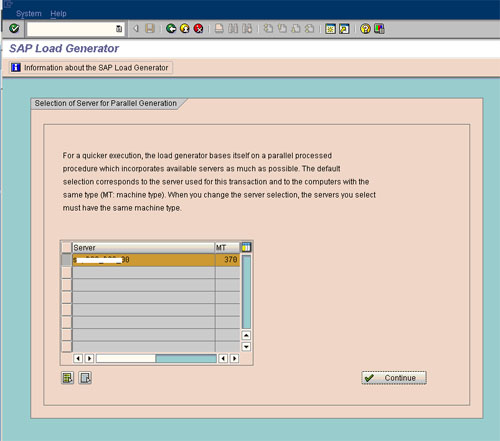
2 Post Steps – SGEN
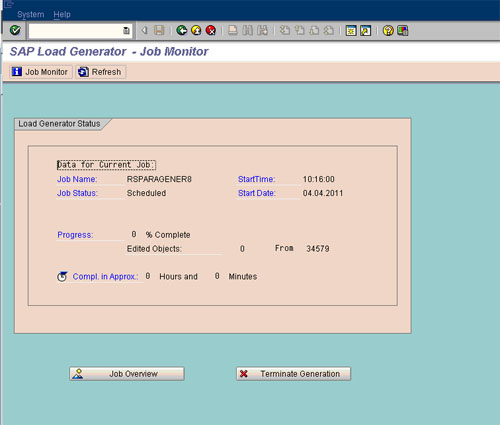
Once import is completed, proceed to run SGEN to recompile all the new imported objects before releasing the system. Steps shown below.
Run SGEN with options
Regeneration of existing loads
Only generate objects with invalid loads
Wait until finished !
Appendix – Additional Info
2.1 Checklist before Import of SPs
This is my checklist but others may have more to add (or remove!)
- Confirm and sign-off the support pks and combination of SPs that will be applied and project/test team available for testing
- Verify all functional and cross-system dependencies are met. Must review and OSS note 822379 (netweaver 7 version)
- Enough Disk space and atleast 85% free space on sapdata filesystem
- Check if file system /usr/sap/trans/data and ../EPS/in has free space, if not clean-up old support package data files or Pat files in EPS/in
- Post a system message & a login screen message indicating the outage (refer to procedure Applying Support Packages).
- Check if no tablespace is over 85 % full
- Verify if you have a recent backup., if not schedule a full on-line backup. If production, have a backup just before Support pkgs to be safe.
- Unpack all required SP’s and then load them into SPAM and verify that all queues are OK e.g SAPCAR -xvf /sapcd/sp/XXXXXXX.CAR –V
9. Update Spam with latest version from Service marketplace. Also ensure binaries R3trans and tp are updated if necessary. If you are not sure, usually it will not hurt to update these anyway.
10. Define Queue and perform TEST import and report any SPDD/SPAU conflicts to project/developers
2.2 Using SolMan to download Support Packages
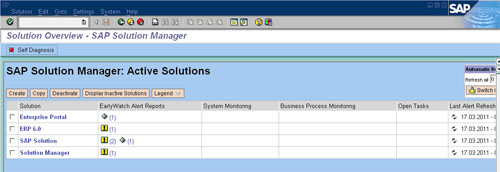
Call tcode /nsolution Manager
Select the Solution ‘SAP Solution’ if you are going to download SP’s for ECC 6.0 SAP System for your environment.
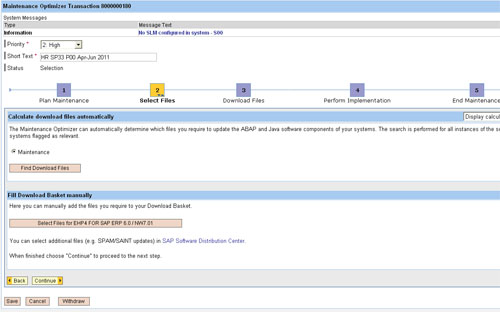
Create a new ‘Maintenance Optimizer’ or use existing
Here you can select the SP’s to download either manually and automate i.e Let SAP decide
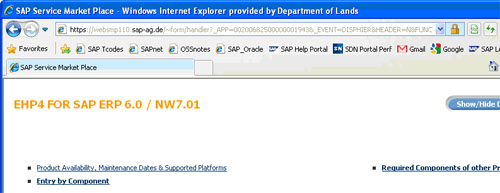
A Web browser window will pop up and you need to manually look for and select the e.g HR support pkgs.
Steps to be performed (in order) to configure CTS+ on Solution manager (S00) for Portal (EP*) transports
This documentation is adapted from SAP Help and my own experience.
Generally all settings and configuration is done on S00 (except for Section 3). Execute the steps in order. Basically First you (i) Configure CTS Deploy Web Service and then (ii) Define and Configure Non-ABAP system (iii) Configuring Transport Organiser Web UI. The steps in here just explain how to add one Portal development system (ED0) to the CTS+ systems (ie S00). You need to repeat the steps for Portal QA and Production systems with slight variation. Of course as usual, the exact configuration will depend on your business scenario and organisational requirements or restrictions.
1. Configuring the CTS Deploy Web Service
The following steps describe how to configure the CTS Deploy Web service, using a dual-stack system as an example:
Checking the CTS Deploy Web Service
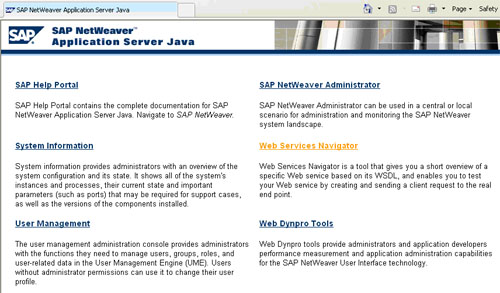
1. In SAP NetWeaver Application Server Java (i.e EP), open the CTS server.
2. In your Web browser, enter the following URL:
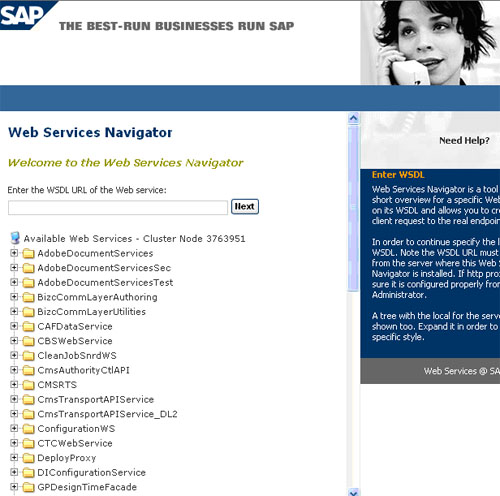
3. Open Web Service Navigator. (Login with user Administrator)
The DeployProxy Web service is in the list of deployment Web services.
Configuring the HTTP Connection
You are in SAP NetWeaver Application Server ABAP in your CTS system (ie SolMan S00).
…
1. Call transaction SM59.
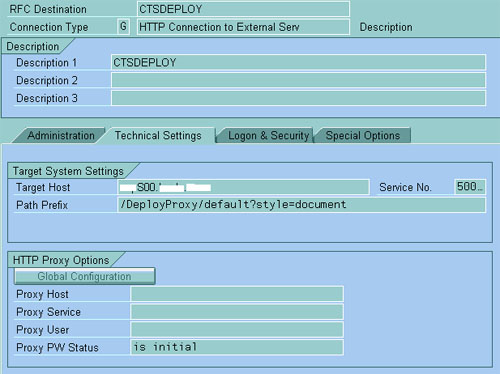
2. Create a new HTTP connection called CTSDEPLOY.
3. Choose the Technical Settings tab page.
a) Enter the name of the target host, the service number (5<SAP system number>00), and the path prefix /DeployProxy /default?style=document. Confirm by choosing Enter.
b) If you encounter warnings about invalid query strings or missing documentation, ignore them by choosing Enter.
c) Save your entries.
4. Choose the Logon and Security tab page.
a. Select Basic Authentication as the logon procedure.
b. Enter a J2EE user name (J2EE_ADMIN) and password.
c. Save your entries.
5. To test the new HTTP connection, choose Connection Test.
If you have created the new HTTP connection successfully, the status text in the test results is set to OK.
6. Large objects can cause timeouts in deployments. Always set the timeout to be longer than the
- Call transaction SM59.
- Choose HTTP Connections to External Server ® CTSDEPLOY.
- Select the Special Options tab page.
The ICM Default Timeout option is selected as the default under Timeout.
Select a timeout that is higher than the longest expected deployment. If in doubt, select No Timeout to avoid the connection timing out during a deployment.
Configuring the Logical Port for the Web Service
Use
Logical ports for Web services are Customizing objects.
Prerequisites
To configure a logical port, you must enable Customizing changes to be made in client 000. You can cancel these changes once you have configured the CTS Deploy Web service.
Setting the System Change Option
You are in SAP NetWeaver Application Server ABAP in your CTS system.
…
1. Call transaction SE03.
2. Choose Administration ® Set System Change Option and choose Execute.
The System Change Option screen appears
3. Choose Client Setting.
The Display “Clients” View: Overview screen is displayed.
4. Select the client 000.
5. Choose Change ® Display.
A dialog box with the message Caution: The table is cross-client. appears.
6. Choose Continue to confirm.
7. Make the following changes:
a. Choose Detail.
The Display “Clients” View: Detail screen is displayed.
b. Select Automatic Recording of Changes.
8. Save your entries.
Creating a Logical Port
You are in SAP NetWeaver Application Server ABAP in your CTS system.
…
1. Log on to client 000.
2. Call transaction LPCONFIG (SOAMANAGER for later versions)
The Display/Create Logical Port screen is displayed.
3. Select the proxy class CO_TFLDEPLOY_PROXY_VI_DOCUMENT from the proxy list.
4. Enter CTSDEPLOY as the logical port.
5. Choose Create.
The Create Logical Port screen is displayed.
6. Enter a description for the logical port and select the Default Port checkbox.
7. Under General Settings, choose the Call Parameters tab page.
8. Select CTSDEPLOY as the HTTP destination.
9. Save your entries.
A dialog box is displayed that prompts you to specify a customizing request.
10. Enter your changes in a change request.
11. Activate the logical port of the CTS Deploy Web service.
http://help.sap.com/saphelp_nw70/helpdata/en/45/f9f02cf3e41ecce10000000a1553f7/frameset.htm
6. Defining and Configuring Non-ABAP Systems
Ref:
http://help.sap.com/saphelp_nw70/helpdata/en/45/f64a3dbc1a04a9e10000000a114a6b/frameset.htm
Use
When you create a transport landscape in Transport Management System (TMS), you define how you want objects to be transported between systems in the different phases (development, quality assurance, and production) of the software lifecycle.
Prerequisites
You have configured the CTS Deploy web service.
Creating Non-ABAP Systems
You are in your TMS domain controller ie Solution Manager Domain controller (typically there is only one Solution manager in the landscape and it is its own Domain controller)
…
Call transaction STMS.
Choose Overview -> Systems
Choose SAP System ® Create ® Non-ABAP System.
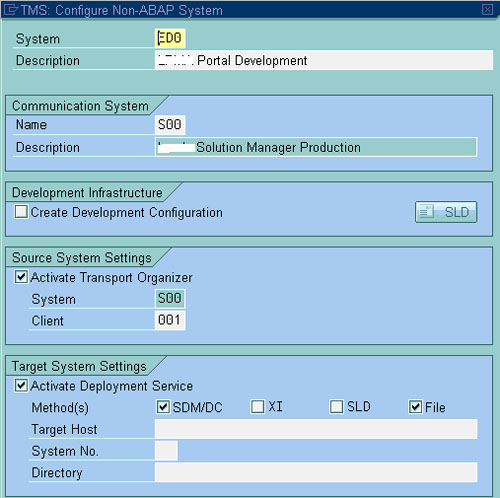
The TMS: Configure Non-ABAP System dialog box is displayed.
Create the non-ABAP system with a system ID and a description.
Select the CTS system as the communication system.
Make the following settings, depending on whether your system is a source system or a target system (or both):
- ○ Non-ABAP system as source system
Under Source System Settings, select the Activate Transport Organizer flag and enter the client where you want to use Transport Organizer.
- ○ Non-ABAP system as target system
Under Target System Settings, select the Activate Deployment Service flag. Select your preferred deployment methods and fill out the rest of the fields accordingly.
Enter a system user and password for your preferred deployment methods.
Save your settings and confirm that you want to distribute the TMS configuration.
The system now generates all parameters and their values automatically by default. To display these parameters, select your system in the system overview and choose the Transport Tool tab page.
Result
You have configured your non-ABAP systems and you can now check whether your settings are configured correctly.
Your systems are ready to be included in a transport route in CTS. In CTS, proceed as usual for ABAP systems. However in this case, we are only adding the Portal Development system (ED0) to the lansdcape and will not be configuring the transport route.
7. Configuring Transport Organizer Web UI
Reference: http://help.sap.com/saphelp_nw70/helpdata/en/ea/6213584a3f49119eccd7d739e55d5d/frameset.htm
Now proceed to configure Transport Organizer Web UI before you can use it for your transports in SAP NetWeaver application.
You configure Transport Organizer Web UI by performing the following activities:
Changing the Standard Settings for Source Systems
If you want to change the standard settings (configured automatically when you created your non-ABAP systems or dual-stack systems), you must adjust the parameters in your source systems or add new parameters.
Prerequisites
You have created non-ABAP systems or dual-stack systems with automatically generated standard settings.
Procedure
a) Call transaction STMS.
b) Choose Overview -> Systems.
c) Select a system -> Click on Display configuration
The screen Display TMS Configuration: System <SID> appears.
d) Choose the Transport Tool tab page.
e) Switch to change mode (pencil).
f) As required, add the following parameters that control the behavior of the source systems:
- NON_ABAP_WBO_CLIENT
Client of the CTS system
Specify the client in which you want to use Transport Organizer for this non-ABAP system.
- NON_ABAP_WBO_INBOX
Path to the directory where Transport Organizer searches for files – This needs to be read/write and available to both S00 and EP development system ED0. E.g NFS mount or similar
This parameter enables you to choose between a close or loose coupling of your SAP applications and CTS:
- Close coupling
You need this parameter setting when you attach files to a transport request from a server share/mount.
The default setting uses file streaming (see parameter WBO_FILE_TRANSFER).
- Loose coupling
You need this parameter setting when you attach files to a transport request from a server and not from a desktop (client).
More information: Choosing a File Transfer Method
- WBO_FILE_TRANSFER
File transfer method between applications (clients) and the CTS system (streaming or file share/mount)
You need this parameter only if you choose a close coupling.
More information: Choosing a File Transfer Method
- WBO_GET_REQ_STRATEGY
Automatically creates a transport request when you export an object from an SAP NetWeaver Portal system or an SAP NetWeaver PI system.
More information: Choosing a Transport Strategy
- WBO_REL_REQ_STRATEGY
Automatically releases a transport request if close coupling with an SAP NetWeaver Portal system, SAP NetWeaver PI system, or SLD system is chosen.
More information: Choosing a Transport Strategy
- CTS_SYSTEM_MAPPING
Enter the system ID of your non-ABAP system if it is not the same as the name of the corresponding non-ABAP system in TMS.
If possible, always create your non-ABAP systems in TMS with the same system ID that you gave the non-ABAP system when you installed it.
- CTS_SYSTEM_TYPE
Classification of the systems in transaction SMSY for SAP Solution Manager scenarios
When you create a non-ABAP system, this parameter is generated with the value JAVA automatically. For non-SAP systems, change this parameter to OTHERS.
Activating the Web Service for Transport Organizer Web UI
Use
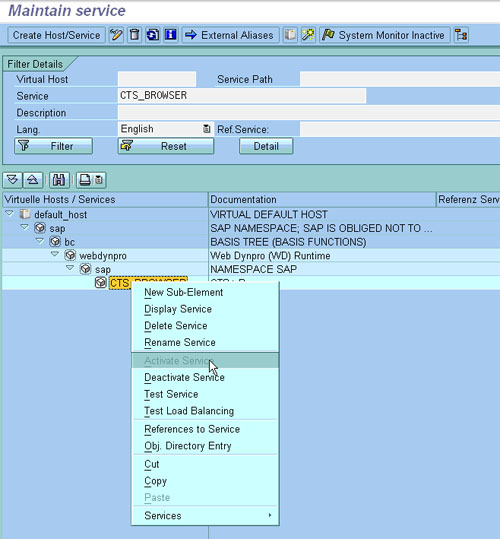
To check in non-ABAP objects to a transport request, you must activate the Web service CTS_BROWSER.
Prerequisites
● You need authorization for transaction SICF.
● All ICF services required to run an ABAP Web Dynpro application are activated.
For more information, see SAP Note 517484.
Procedure
a) Call transaction SICF. This transaction is a cross-client transaction. Enter SERVICE in the Hierarchy Type field and CTS_BROWSER in the Service Name field. Choose Execute. Select the Web service (CTS_BROWSER) on the Maintain Services screen. Activate the Web service by opening the context menu (secondary mouse button) and choosing Activate Service.
A dialog box for activating IFC services is displayed.
Choose Yes (with tree icon).
Starting Transport Organizer Web UI
Use
You must start Transport Organizer Web UI before you can begin editing and organizing your transport requests.
Procedure
- Log on to the SAP system client with the user and password that you want to use to start Transport Organizer.
- To start Transport Management System (TMS), call transaction STMS.
- To do this, choose Environment ® Transport Organizer Web UI. (enter the EP* portal System ID when prompted)
This starts Transport Organizer Web UI for the client to which you are logged on.
In the System dialog box, choose the system ID of the system for which you want to organize your transport request. This is usually the development system.
Customizing for Application Types
Use
The application type is purely a display attribute and does not determine the deployment method. Application types are used in the CTS_BROWSER Web Dynpro to classify attached objects. You can also add your own application types manually in the table CTS_RQ_APPLID.
Procedure
…
a) Call transaction SE16.
The Data Browser: Initial Screen appears.
b) In the Table Name field, enter CTS_RQ_APPLID.
c) Choose Table Contents or Enter.
The Data Browser: Table CTS_RQ_APPLID: Selection Screen appears.
d) Leave the Application field empty and choose Execute.
The Table CTS_RQ_APPLID screen appears.
e) Choose Create.
The Insert Table CTS_RQ_APPLID screen appears.
f) Enter the name of the application in the Application field.
When you choose the F4 help in the Application field, the application name you entered appears in the list box.
g) Enter a description of your application type in the Description field.
h) Save your entries.
Now proceeed to make transport settings in the application, with the steps below
CTS+ browser is now working, proceed with the following steps
Making Transport Settings in the Application
Configure the destination service
If you want to transport objects directly from an SAP NetWeaver PI or SAP NetWeaver Portal application, you must connect the application to the transport system.
To do this, make the following settings in your SAP application and in the transport system:
Prerequisites
● You have change authorization in Visual Administrator.
● You have a user with the appropriate authorizations in SAP NetWeaver Application Server Java.
Procedure
…
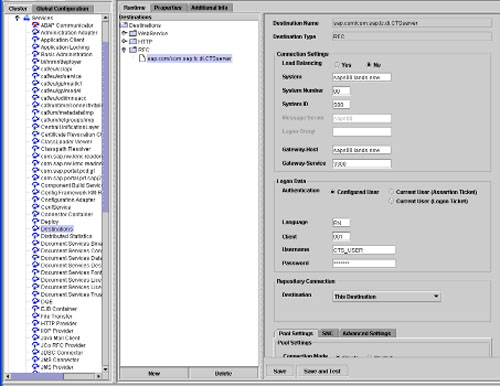
1. Open Visual Administrator on the installation drive of SAP Application Server Java.
2. Choose Cluster ® Server ® Services ® Destinations.
3. Create an RFC connection called sap.com/com.sap.tc.di.CTSserver by choosing Create.
4. Under Connection Settings, enter the connection data of your CTS server.
5. Under Logon Data, select the Current User (Logon Ticket) option as authentication for the connection to your CTS server. We recommend that you use Single Sign-On (SSO).
If you cannot use SSO, select the Configured User option and enter your preferred language, a client, and an appropriate user and password.
Enter the client entered in the parameter NON_ABAP_WBO_CLIENT in TMS.
6. Use the default settings under Repository Connection and Pool Settings.
7. Save your entries.
If you want to test the connection, choose Save and Test.
Result
You have created a connection between your SAP application and the transport system. You can now attach objects to a transport request directly in your application.
The below two steps have been covered above but are included again to ensure you have selected the correct values and to review those values:
Choosing a File Transfer Method (repeat)
To add non-ABAP objects to a transport request, you must transfer these objects (files) to the CTS server on which Transport Organizer is located. You can transfer a file to the CTS server in the following ways:
● You can use Transport Organizer Web UI to attach objects from the desktop to a transport request.
● You can use a mount directory or a share directory. In this case, you must set the parameter NON_ABAP_WBO_INBOX and specify in which directory you want to search for the objects to be attached to the transport request.
● If your SAP application is closely integrated with CTS (this is the case for SAP NetWeaver Portal, PI, NWDI, or SLD systems), you can attach objects directly from the application by default. The data is transferred to the CTS server using SAP Java Connector (JCo). In this case the parameter WBO_FILE_TRANSFER is set to Stream by default.
If you want to improve performance by transferring files using a share or a Network File System (NFS), you must set the parameter WBO_FILE_TRANSFER to Share
Choose a transport strategy (repeat)
Use
You can influence the behavior of the transport system when you create and release transport requests by configuring the strategy parameters. In this way, you provide optimum support for your chosen transport process (automatic or manual creation and release of requests).
You only require these parameters for applications that have a close coupling with the CTS system (such as SAP NetWeaver Portal systems and SAP NetWeaver PI systems).
Prerequisites
You have configured the connection between your application and the CTS server.
Procedure
…
1. Call transaction STMS.
2. Choose Overview ® Systems.
3. Select a system.
4. The screen Display TMS Configuration: System <SID> appears.
5. Choose the Transport Tool tab page.
6. Switch to change mode.
7. Add the following parameters:
- WBO_GET_REQ_STRATEGY
Automatically creates a transport request when you export an object from an SAP NetWeaver Portal system or an SAP NetWeaver PI system.
The following values I’ve used
- Smart
The system creates a transport request (if not already available) and flags it as the standard request. - WBO_REL_REQ_STRATEGY
Automatically releases a transport request in an SAP NetWeaver Portal system or an SAP NetWeaver PI system.
The following values I’ve used
- Auto
The system releases a transport request automatically as soon as an object is added to the request in an SAP NetWeaver Portal system or an SAP NetWeaver PI system.
E.g If you want to involve the developers of your SAP NetWeaver Portal or SAP NetWeaver PI application as little as possible in transport system activities, configure the strategy parameters as follows:
- WBO_GET_REQ_STRATEGY = Smart
- WBO_REL_ REQ_STRATEGY = Auto
Whenever an SAP NetWeaver Portal developer, for example, exports non-ABAP objects, the system creates a new transport request automatically and then releases it.
Appendix A
References:
Exporting Portal transports using SAP CTS: http://help.sap.com/saphelp_nw70/helpdata/EN/f0/9529a4fe084f5fb4c2be5a34f233b7/frameset.htm
CTS+ FAQ on SDN
http://www.sdn.sap.com/irj/sdn/cts?rid=/webcontent/uuid/3054e6f4-7b17-2b10-638f-804138f129d2
Step-by-Step Procedure for SPAM Update/patching.
In this Blog we will look at updating SPAM . SPAM or Support Package Update Manager is one of the two (The other being SAINT) primary tools for patching SAP ABAP system . For updating SAP Java systems you use JSPAM . If time permits I will write more about the differences and SAP’s overall release & versioning strategy and JSPAM (or lack of it!).
Updating SPAM is a relatively straightforward and simple procedure. The key thing to remember is that you MUST always update your SPAM before proceeding with any Support Package update. Even if you are simply conducting a review to determine the dependencies of the different support packages and which ones to eventually include in the SP upgrade project, you need the latest SPAM version otherwise you could be working with incorrect or outdates information.
Having said that, SPAM is not always 100% correct in determining dependencies. I had a experience where it was asking for a secondary dependency which we could find on SAP Marketplace. Eventually after much investigation and logging a call with SAP Support, I was told to ignore the dependency…so just a warning
Step by Step Instructions
In SAP, you always “uncar” (unzip) your sap packages using the SAP tool SAPCAR
Unpacking SAPCAR archives: Uncar in folder /usr/sap/trans
sapD00:d00adm 42% SAPCAR -xvf /usr/sap/trans/spam/KD70142.SAR -V
SAPCAR: processing archive /usr/sap/trans/spam/KD70142.SAR (version 2.01)
x EPS/in/CSN0120061532_0049370.PAT
SAPCAR: 1 file(s) extracted
Tip: Always uncar in /usr/sap/trans as in will create the directories /EPS/in under this directory structure otherwise it will create the …/EPS/in the whichever directory you unzip
Location after expand/Uncar: (must be in this location for SPAM to see it)
/usr/sap/trans/EPS/in
PS: You can also directly import the package from you local desktop.
SPAM Update:
Step 1- Load packages
Log into SAP and call tcode SPAM. It will see the new unzipped packages in ../EPS/in folder
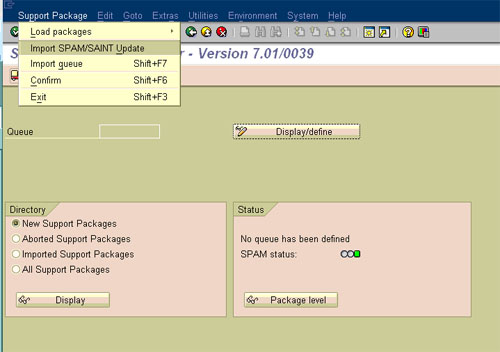
Step 2 – Import Spam update
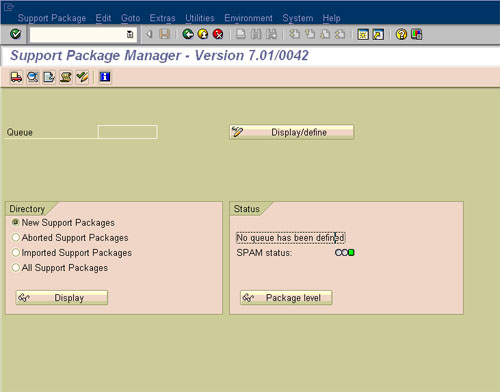
SPAM Updated Successfully!! (Make sure you see a green light)
Possible Errors: You may get an ABAP Dump at the end. Don’t Panic! Simply restart the SPAM tcode and you should see the green light and to confirm it is updated, make sure it reads the new version e.g in this case 7.01/0042
