ECC6 EHP4 READY – HOMOGENEOUS SYSTEM COPY USING MANUAL BACKUP/RESTORE METHOD ON ORACLE-10g/SOLARIS-10
Start. Welcome. screen, select the right Type of installation i.e
SAP ERP 6.0 EHP4 Ready – Support Release 1 -> System Copy -> Oracle -> Target system -> Central System -> Based on AS ABAP
In this case we are installing a pure ABAP system without the Java stack. Depending on the situation, you may need to install a dual stack or even a pure Java system (e.g portals) and in that case, the steps can differ.

You may want to customise certain parameters but do this only if you know what you are doing and have all the correct information.

NB: Screen has been cropped to save space and hence you will not see the Next & Back button on all screen dumps
Choose the folder where you have installed JDK version (usually under/usr/..). Don’t use JRE version greater than 1.5.

Enter the new SID you want to use. System mount directory is always /sapmnt.

Enter the new SID you want to use. System mount directory is always /sapmnt.
Enter Master password – this password is used for all user accounts so make sure you write it down somewhere safe and remember it!

Choose Homogeneous ….if usng brtools, RMAN or manual data file backup/restore method.
Only choose ‘Standard System Copy; if you have exported your database previously using SAPINST tool.

Always keep Database SID same as SAP SID i.e in this case TDO

Ignore any warnings if you are confident your prerequisite checks have all been resolved. (You may have used a more recent version of PREREQUISITE CHECKER XML file from SAPnet and performed the check previously).

Allocate correct amount of memory for SAP & Oracle instance (remember OS will need additional memory ).
From ECC6 onwards, use SAPSR3 as the ABAP Schema

Allocate correct amount of memory for SAP & Oracle instance (remember OS will need additional memory ).
From ECC6 onwards, use SAPSR3 as the ABAP Schema
Define correct destination folders for CD’s.

Review all parameters before proceeding.

Installation will start…next enter Solman Key

See note 811923 on how to generate Key from SolMan.


NB: You may not get this screen if you already installed your RDMS software. SApinst is smart enough to know and will skip.
If you have not installed RDMS, it will ask you to install Oracle and then continue as seen here on the screen dump to the right.
Click on this document to see the oracle installation steps:

Click Ok to continue after you have restored the Database using Database or Brtools.
Steps to restore OLDSID (ie database from D00 to TD0):
For the database level homogenous system copy , we need to copy the database files from the source system to the target system. Files that are required are (make sure db is shut down). The steps to complete this exercise at as follows
(1) On target server, create pfile from spfile using SQLPLUS
(2) Copy the below files (either using unix scp/cp or from a cold backup):
i) All files in ../oracle/SSID/sapdataX/* copied to corresponding ../oracle/TSID/sapdataX/*
ii) All files in origlog A & B and mirror log A & B
ii) init<SID>.ora parameter (which is typically in /oracle/102_64/dbs)
(3) Once the DB files are copied across, we create a softlink (in target system) pointing the old path i.e /oracle/SSID -> /oracle/TSID
4.Startup database using pfile=init<TSID>.ora on the target server
5.’Alter database backup controlfile to trace;’ <- file will be created in usertrace
6.Shutdown TSID
7.Modify the trace file generated in step 5 as follows:
i) make it as a “xxx.sql” file.
ii) delete all lines before the second STARTUP (i.e startup using RESETLOGS option)
ii) replace REUSE with “SET” DBNAME in the line CREATE CONTROLFILE…
ii) replace SSID with TSID in trace file,
iv) comment out the first line “STARTUP…”
iii) Modify all SSID reference to TSID (new sid).
iv) comment out ‘RECOVER DATABASE USING BACKUP CONTROLFILE’
8.Modify initD00.ora to create initTD0.ora (including archive log destination e.g D00arch->TD0arch
9.Startup nomount pfile=initTD0.ora
10.Run SQL script created in step 6.
11.Startup database on target server under new SID. Done.
(REMEMBER to delete “fix” line D00 init file before doing anything)

It continues after Oracle is installed (and patched) and creates the <NEWSID> environment.
NB: If it complains about missing CONTROL.SQL, make sure you have executed steps 5.1.3 and 5.1.4 of the System copy Guide. You need to do this step even you have successfully restored your database using database tools (e.g RMAN or manual file copy). It is possible to edit the sapinst XMl file to skip this step or mark is successful but I decided not to.

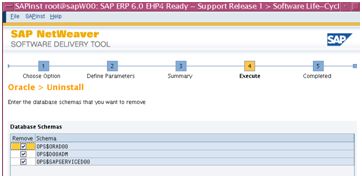
It will ask for confirmation to remove any source system SID related parameters <OLDSID> (in this case oldsid is D00).
Select all relevant boxes and click Next.


Check the oracle pfile (initSID.ora) and alert logs. It is possible that sapinst overwrite the files with its own. Copy back from source and resume.

Continued after fixing above problems (with database oracle).

Near Completing…the last few steps should go smoothly…

Installation completed Successfully! Click Ok and sapinst will exit.
Now proceed to perform post-install steps below.

Posted on September 19, 2011, in SAP Installation and tagged COMMAND, EHP4, Homogeneous, NET, SAP Installation, UNIX, WEAVER. Bookmark the permalink. Leave a comment.


Leave a comment
Comments 0